
Marble Sort Logo
  • Guides
  • Booster Explained
  • Features Explained
  • All Levels
  • Levels 1-10

    12345678910

    Levels 11-20

    11121314151617181920

    Levels 21-30

    21222324252627282930

    Levels 31-40

    31323334353637383940

    Levels 41-50

    41424344454647484950

    Levels 51-60

    51525354555657585960

    Levels 61-70

    61626364656667686970

    Levels 71-80

    71727374757677787980

    Levels 81-90

    81828384858687888990

    Levels 91-100

    919293949596979899100

    Levels 101-110

    101102103104105106107108109110

    Levels 111-120

    111112113114115116117118119120

    Levels 121-130

    121122123124125126127128129130

    Levels 131-140

    131132133134135136137138139140

    Levels 141-150

    141142143144145146147148149150

    Levels 151-160

    151152153154155156157158159160

    Levels 161-170

    161162163164165166167168169170

    Levels 171-180

    171172173174175176177178179180

    Levels 181-190

    181182183184185186187188189190

    Levels 191-200

    191192193194195196197198199200

    Levels 201-210

    201202203204205206207208209210

    Levels 211-220

    211212213214215216217218219220

    Levels 221-230

    221222223224225226227228229230

    Levels 231-240

    231232233234235236237238239240

    Levels 241-250

    241242243244245246247248249250

    Levels 251-260

    251252253254255256257258259260

    Levels 261-270

    261262263264265266267268269270

    Levels 271-280

    271272273274275276277278279280

    Levels 281-290

    281282283284285286287288289290

    Levels 291-300

    291292293294295296297298299300

    Levels 301-310

    301302303304305306307308309310

    Levels 311-320

    311312313314315316317318319320

    Levels 321-330

    321322323324325326327328329330

    Levels 331-340

    331332333334335336337338339340

    Levels 341-350

    341342343344345346347348349350

    Levels 351-360

    351352353354355356357358359360

    Levels 361-370

    361362363364365366367368369370

    Levels 371-380

    371372373374375376377378379380

    Levels 381-390

    381382383384385386387388389390

    Levels 391-400

    391392393394395396397398399400

    Levels 401-410

    401402403404405406407408409410

    Levels 411-420

    411412413414415416417418419420

    Levels 421-430

    421422423424425426427428429430

    Levels 431-440

    431432433434435436437438439440

    Levels 441-450

    441442443444445446447448449450

    Levels 451-460

    451452453454455456457458459460

    Levels 461-470

    461462463464465466467468469470

    Levels 471-480

    471472473474475476477478479480

    Levels 481-490

    481482483484485486487488489490

    Levels 491-496

    491492493494495496
Marble Sort Logo
Features GuideBoosters Guide

Levels 1-10

12345678910

Levels 11-20

11121314151617181920

Levels 21-30

21222324252627282930

Levels 31-40

31323334353637383940

Levels 41-50

41424344454647484950

Levels 51-60

51525354555657585960

Levels 61-70

61626364656667686970

Levels 71-80

71727374757677787980

Levels 81-90

81828384858687888990

Levels 91-100

919293949596979899100

Levels 101-110

101102103104105106107108109110

Levels 111-120

111112113114115116117118119120

Levels 121-130

121122123124125126127128129130

Levels 131-140

131132133134135136137138139140

Levels 141-150

141142143144145146147148149150

Levels 151-160

151152153154155156157158159160

Levels 161-170

161162163164165166167168169170

Levels 171-180

171172173174175176177178179180

Levels 181-190

181182183184185186187188189190

Levels 191-200

191192193194195196197198199200

Levels 201-210

201202203204205206207208209210

Levels 211-220

211212213214215216217218219220

Levels 221-230

221222223224225226227228229230

Levels 231-240

231232233234235236237238239240

Levels 241-250

241242243244245246247248249250

Levels 251-260

251252253254255256257258259260

Levels 261-270

261262263264265266267268269270

Levels 271-280

271272273274275276277278279280

Levels 281-290

281282283284285286287288289290

Levels 291-300

291292293294295296297298299300

Levels 301-310

301302303304305306307308309310

Levels 311-320

311312313314315316317318319320

Levels 321-330

321322323324325326327328329330

Levels 331-340

331332333334335336337338339340

Levels 341-350

341342343344345346347348349350

Levels 351-360

351352353354355356357358359360

Levels 361-370

361362363364365366367368369370

Levels 371-380

371372373374375376377378379380

Levels 381-390

381382383384385386387388389390

Levels 391-400

391392393394395396397398399400

Levels 401-410

401402403404405406407408409410

Levels 411-420

411412413414415416417418419420

Levels 421-430

421422423424425426427428429430

Levels 431-440

431432433434435436437438439440

Levels 441-450

441442443444445446447448449450

Levels 451-460

451452453454455456457458459460

Levels 461-470

461462463464465466467468469470

Levels 471-480

471472473474475476477478479480

Levels 481-490

481482483484485486487488489490

Levels 491-496

491492493494495496
‌
‌
‌
‌
‌
‌
‌
‌
‌
‌
‌
‌
‌
‌
‌
‌
‌
‌
‌
‌
‌
‌
‌
‌
‌
‌
‌
‌
‌
‌
‌
‌
‌
‌
‌
‌
‌
‌
‌
‌
‌
‌
‌
‌
‌
Marble Sort Logo

Marble Sort Guide is not affiliated with, endorsed by, or connected to the original Marble Sort game or its publishers. This is an independent fan site created for informational purposes only. All trademarks and copyrights belong to their respective owners.

Site
Marble Sort GameDownload GameAbout UsBlogContact Us
Featured Levels
Marble Sort Level 62Marble Sort Level 70Marble Sort Level 74Marble Sort Level 75Marble Sort Level 87Marble Sort Level 97Marble Sort Level 99Marble Sort Level 100Marble Sort Level 107Marble Sort Level 110Marble Sort Level 120Marble Sort Level 127Marble Sort Level 130Marble Sort Level 134Marble Sort Level 140Marble Sort Level 148Marble Sort Level 157Marble Sort Level 167
Level Groups
All Levels Walkthroughs1 - 100101 - 200201 - 300301 - 400400+
Legal
Terms of ServicePrivacy Policy
Bubble Word Jam
  • Home
  • Blog
  • Marble Sort Center Tunnel Guide: Clear It the Right Way

Marble Sort Center Tunnel Guide: Clear It the Right Way

May 29, 2026
Marble Sort Center Tunnel Guide: Clear It the Right Way
card-0
card-1
card-2
View Levels Walkthrough

Marble Sort Center Tunnel Guide: How It Works

The number in the middle is the problem. Not the boxes around it. Not the colors you can already see. The Center Tunnel is sitting there like a tiny exchange station, holding boxes inside and blocking your normal path until you drain it.
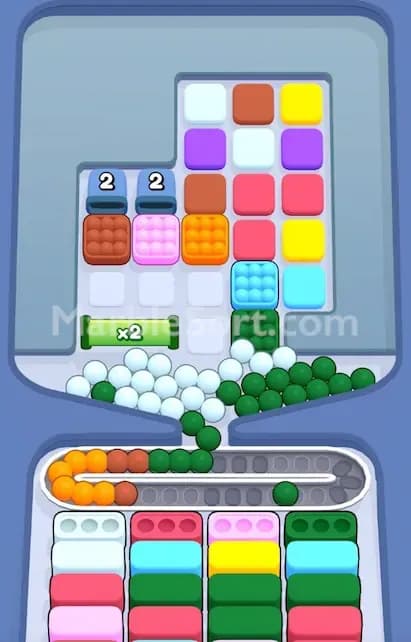
Marble Sort Center Tunnel

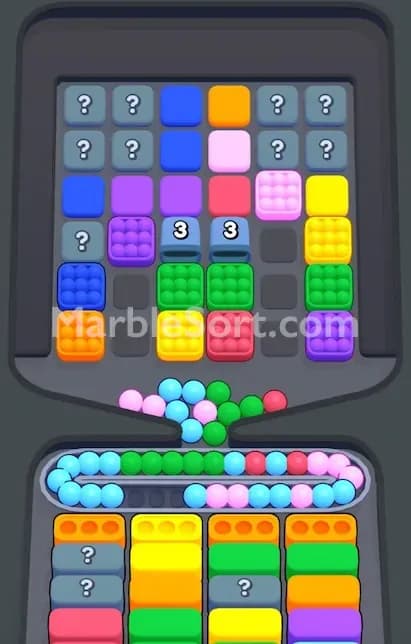
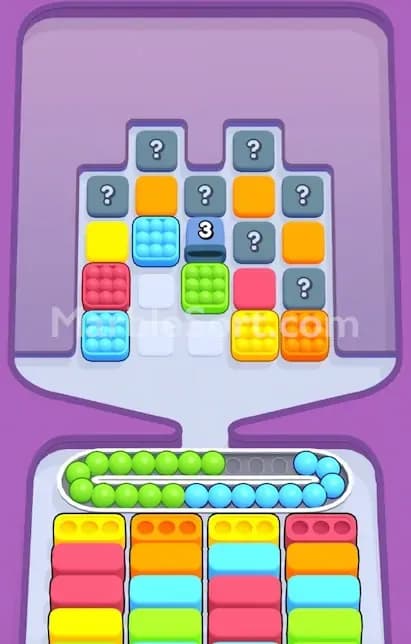
In Marble Sort, the Center Tunnel is an advanced version of the regular Tunnel feature. A normal Tunnel usually asks you to drop a box from its opening side. The Center Tunnel is different. It sits in the center of nearby boxes, and you can release the boxes inside by dropping any box touching it from the top, bottom, left, or right.

That makes it look easier.

It is not.

Because every nearby drop can trigger it, the Center Tunnel can release extra boxes before you are ready. Those boxes might give you the exact marbles you need. They might also dump the wrong color onto the conveyor and start a jam. That is why this feature is sneaky. It gives you more ways to activate it, but fewer safe guesses.

What Is Center Tunnel in Marble Sort?

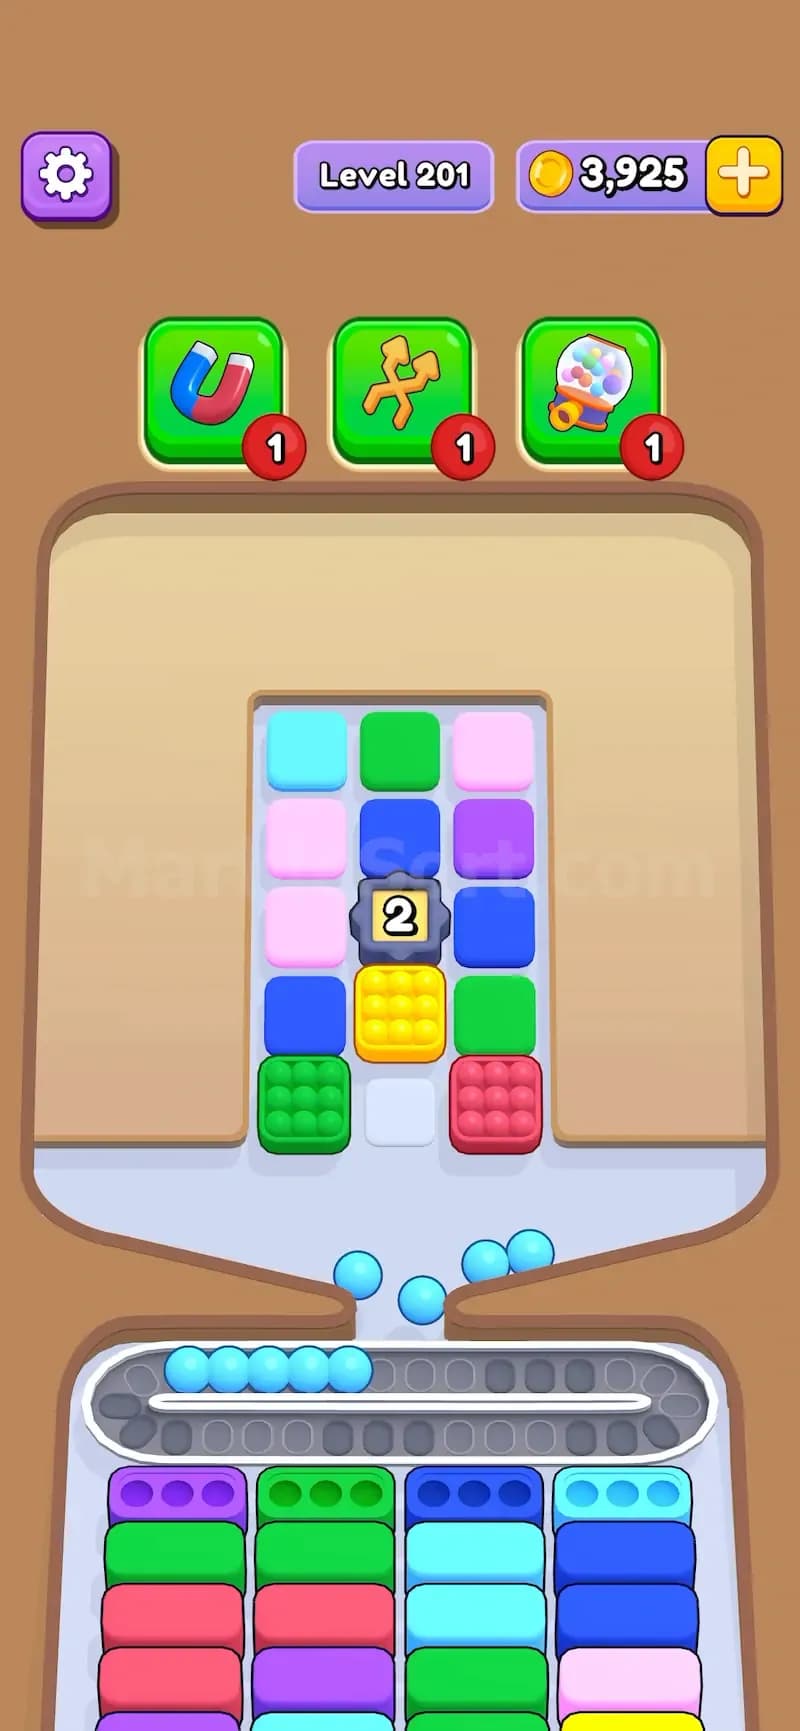
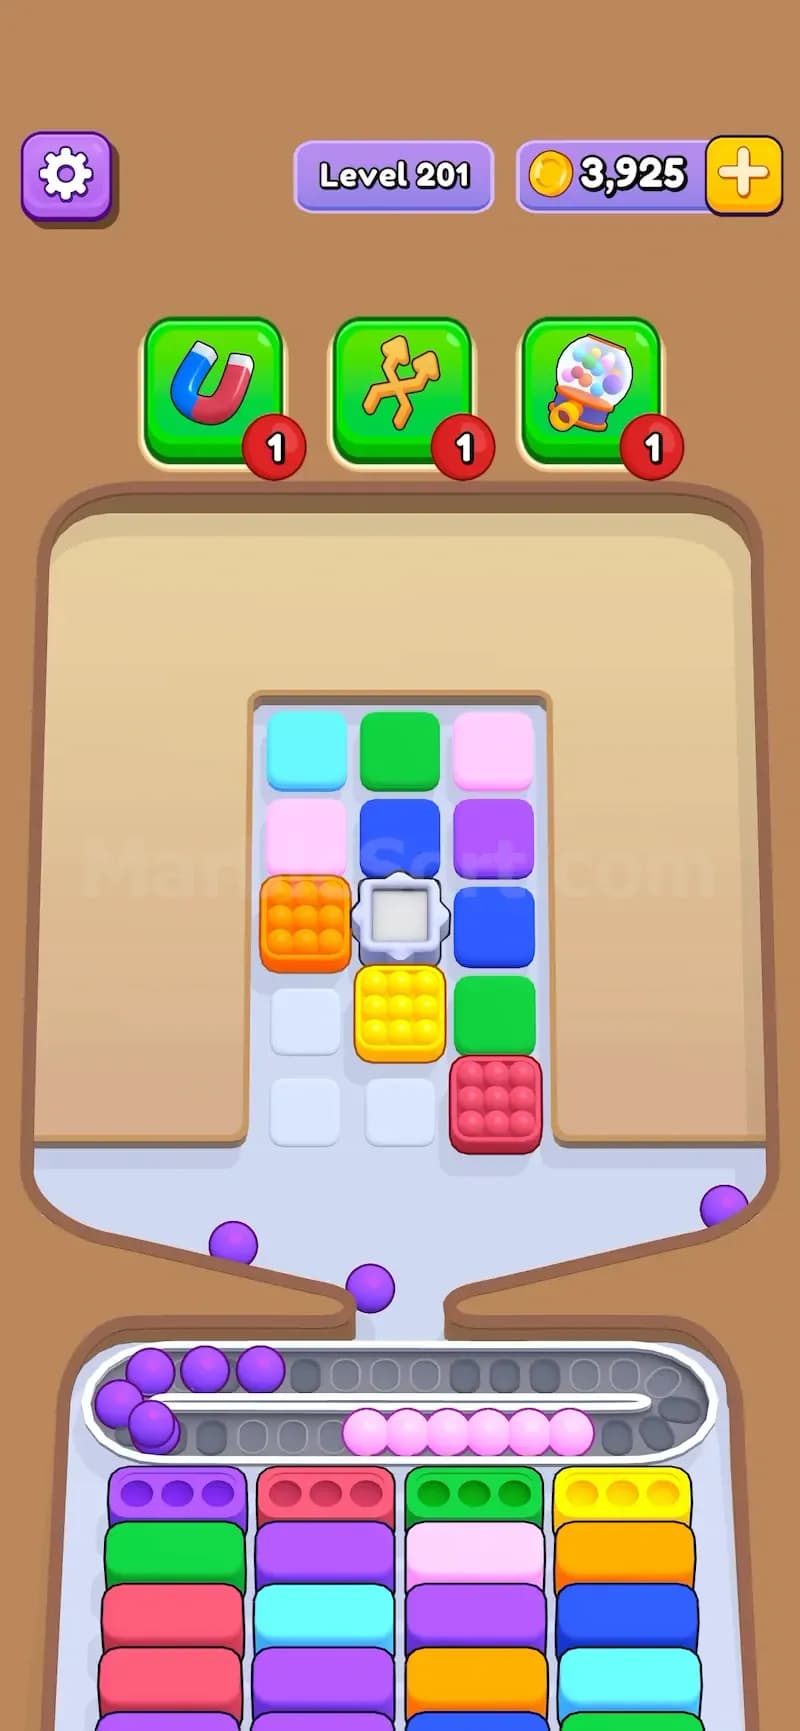
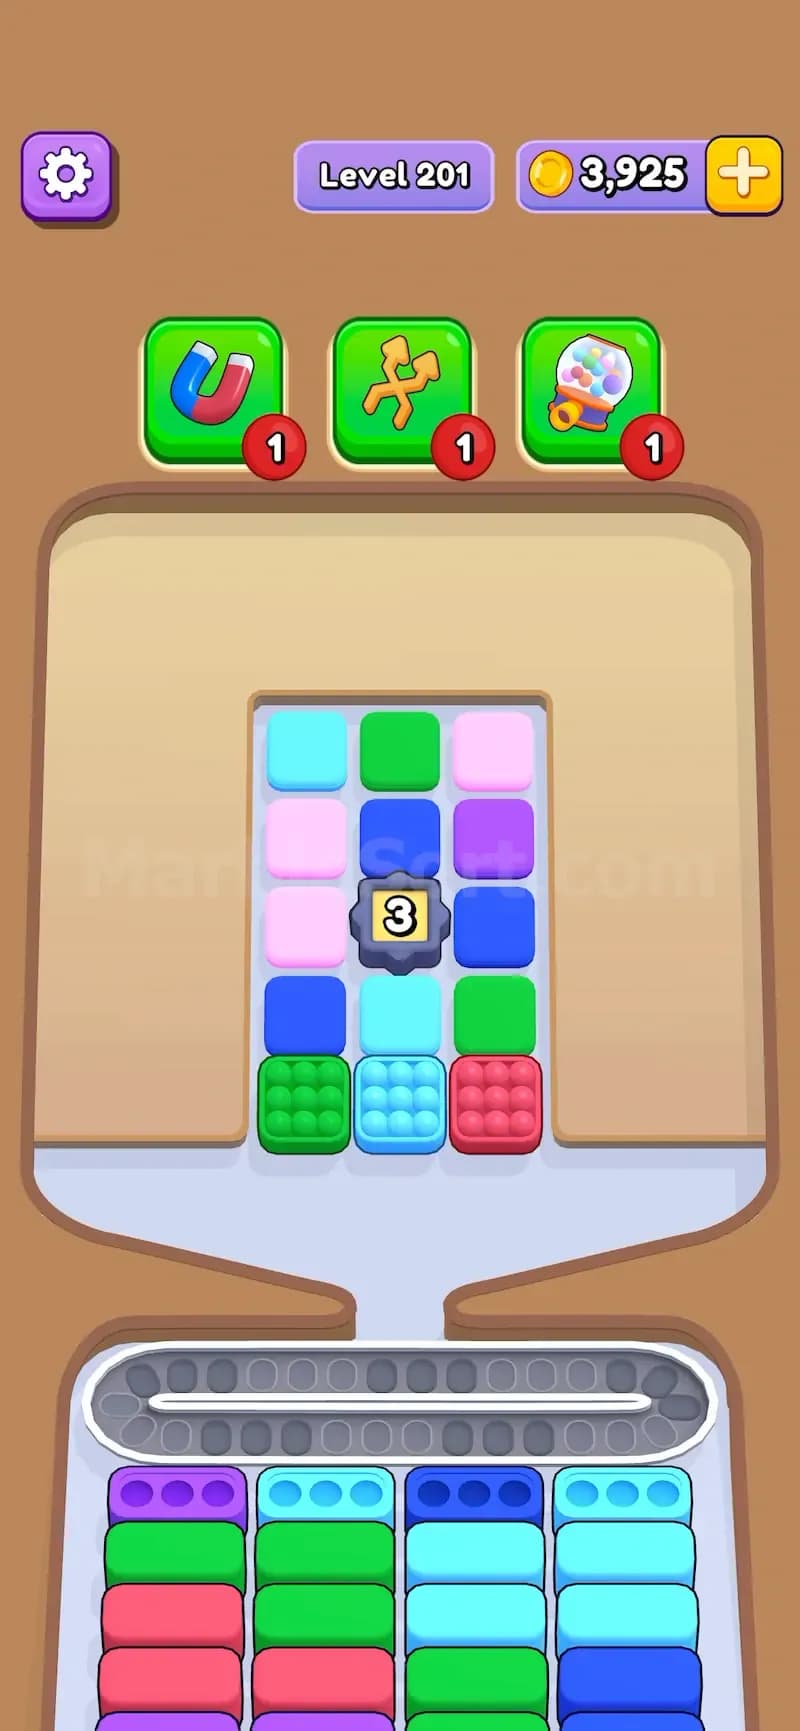
Center Tunnel is the square device with a number on it. The number shows how many boxes are still stored inside.
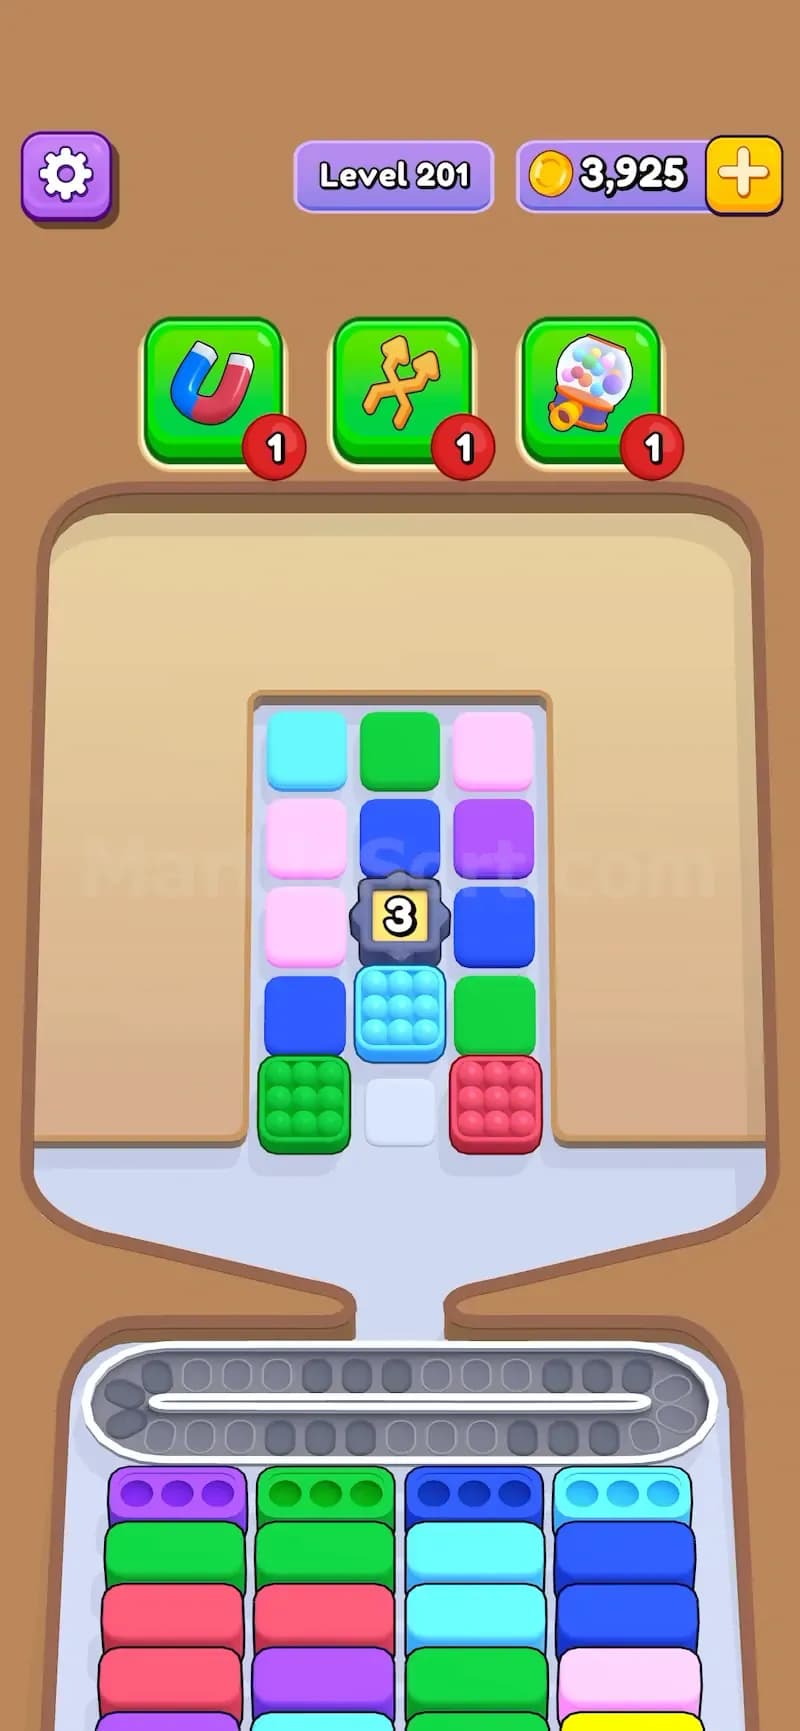
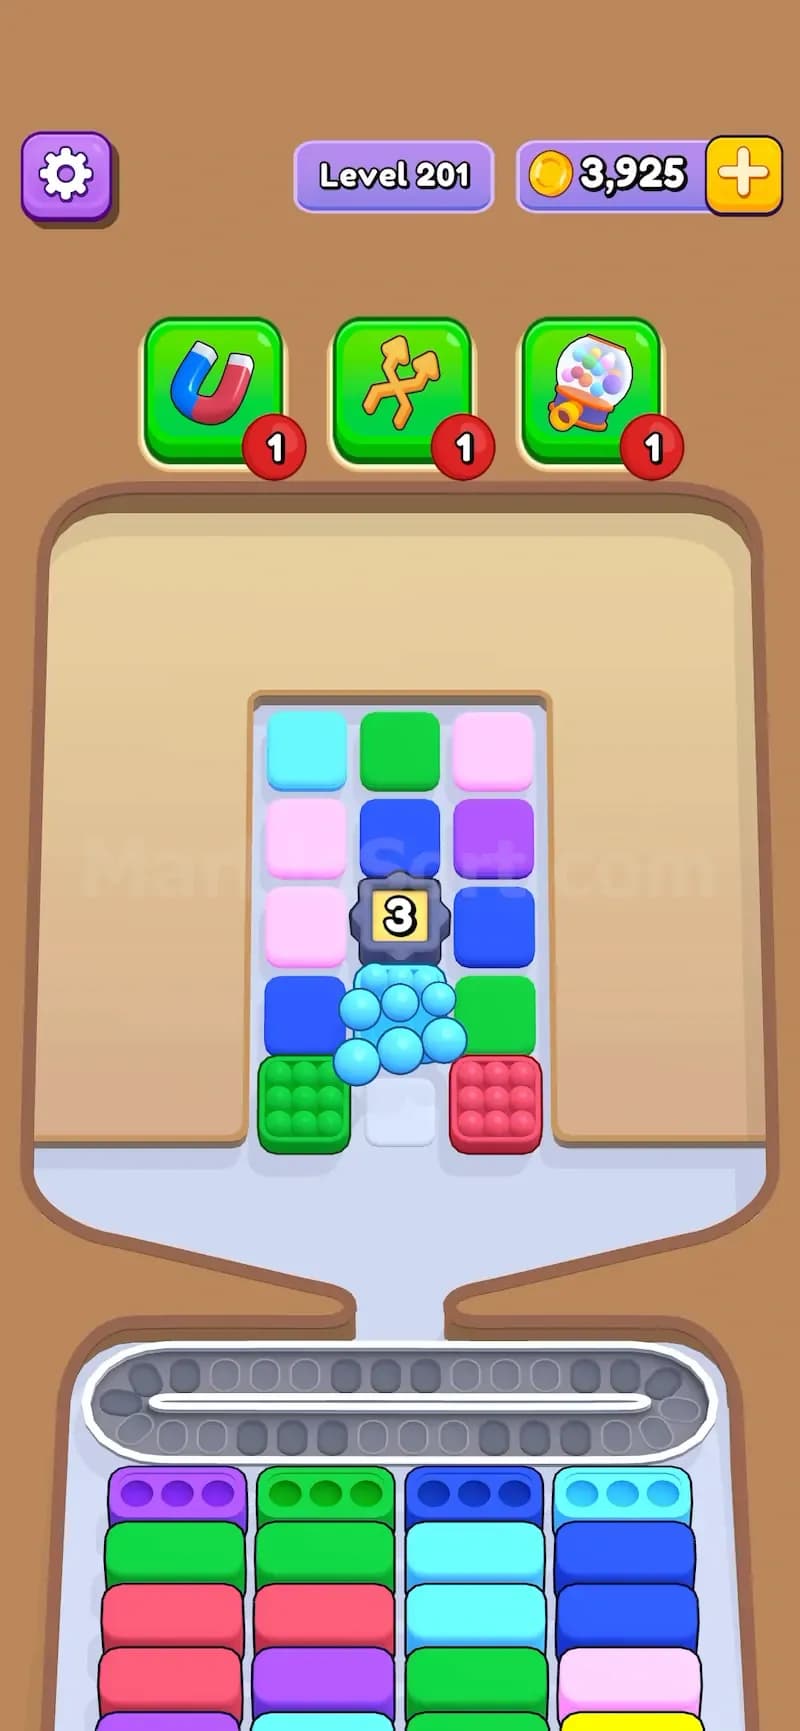
Marble Sort Center Tunnel Marble Sort Center Tunnel Marble Sort Center Tunnel

If the Center Tunnel shows 2, that means there are two boxes inside. Each time you drop a box next to the tunnel, one stored box comes out and the number goes down.

The basic flow is simple:

  1. Find the Center Tunnel number.
  2. Drop a box touching it from the top, bottom, left, or right.
  3. One stored box releases.
  4. The number decreases by 1.
  5. Repeat until the number reaches 0.
  6. Once it hits 0, the Center Tunnel disappears.

That last part matters. When the Center Tunnel is gone, the area around it becomes easier to read. You can reach more boxes, check more colors, and open paths that were blocked before.

How Center Tunnel Blocks the Level

The Center Tunnel acts like a blocker feature. It stops you from exploring nearby boxes in the normal way, especially when it is placed in the middle of a tight board.

In easier levels, the tunnel is usually just a small delay. You drop a couple of nearby boxes, the number reaches 0, and the path opens.

In hard levels, the Center Tunnel becomes a real puzzle piece. The game may hide key colors inside it, or it may use the tunnel to block the route toward the colors you actually need. That means you have to decide whether to clear the tunnel early or leave it alone while you handle safer colors first.

Bad timing hurts.

If you empty the Center Tunnel while the conveyor is already full, the released boxes can flood the board with marbles you cannot place yet. If you ignore it too long, you may run out of useful moves because the tunnel is blocking the next section.

So the real question is not “Can I clear the Center Tunnel?”

The real question is “Should I clear it right now?”

Center Tunnel vs Regular Tunnel

A regular Tunnel usually has a clear opening. You drop the box near that opening to release what is inside.
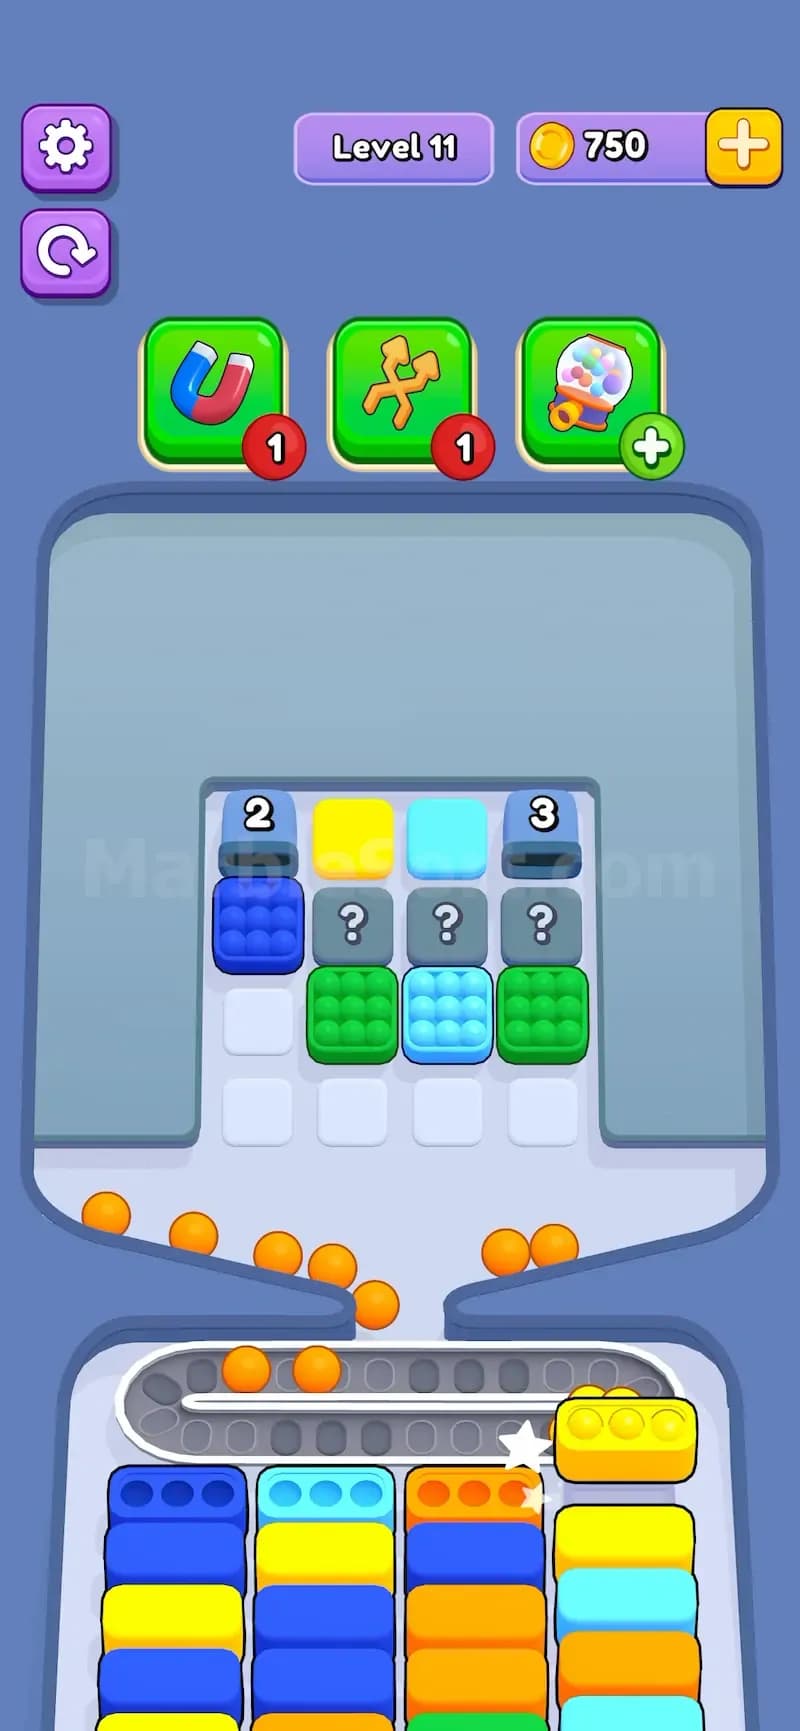
Marble Sort Tunnel

Center Tunnel works from multiple sides.
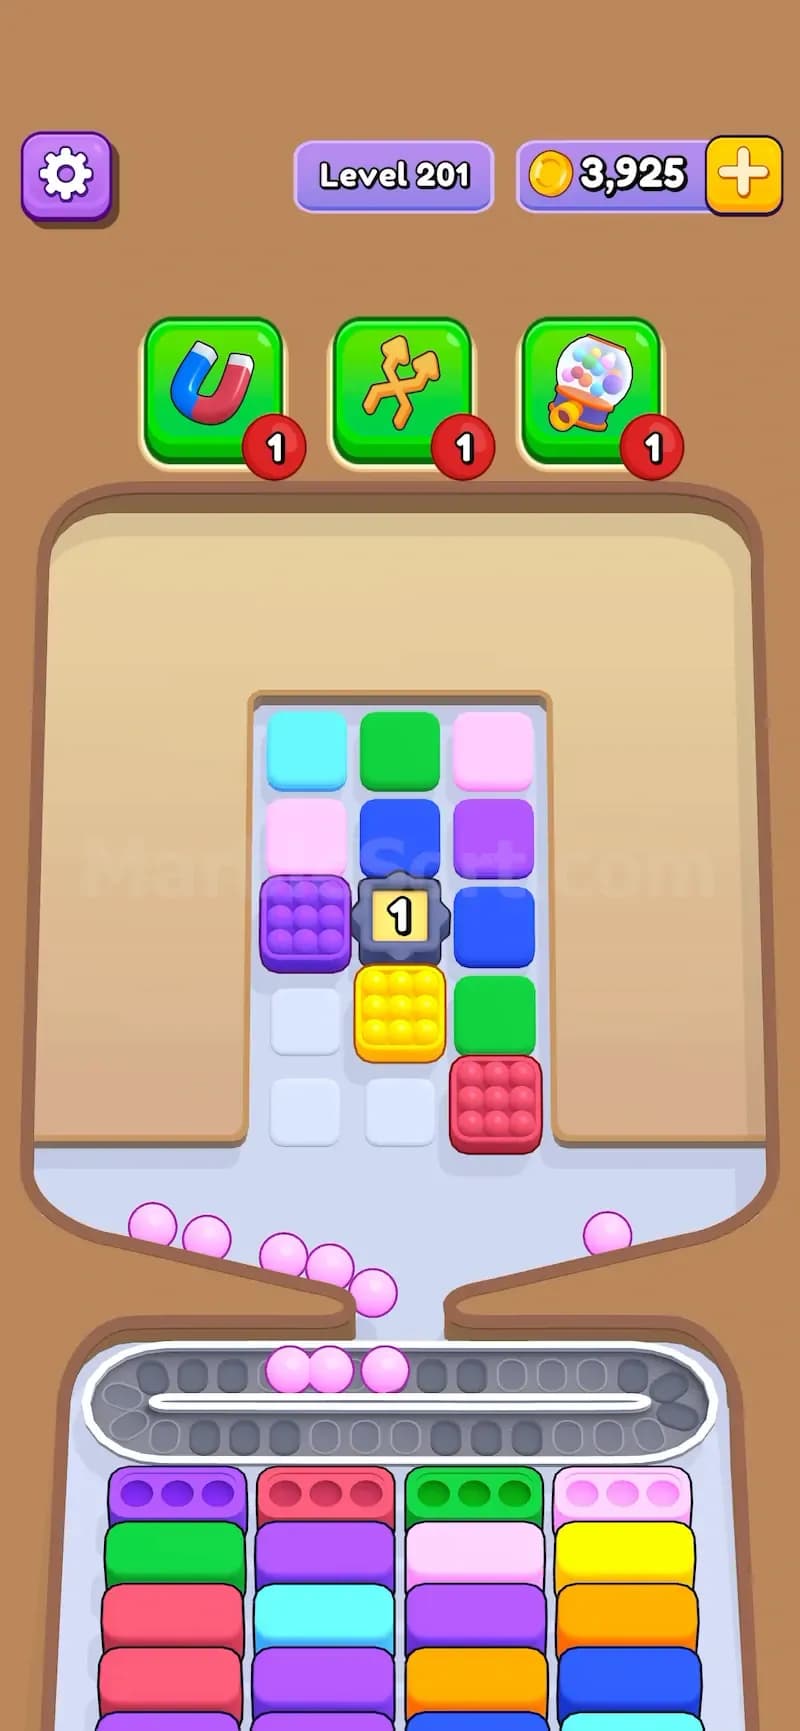
  • Drop a box above it: the tunnel reacts.
  • Drop a box below it: the tunnel reacts.
  • Drop a box on the left: the tunnel reacts.
  • Drop a box on the right: the tunnel reacts.
Marble Sort Center Tunnel Marble Sort Center Tunnel

This gives you more freedom, but it also makes accidental releases more common. A box you wanted to drop for color matching might also reduce the Center Tunnel number. That can be good if you planned it. It can be awful if you did not.

Treat every box touching the Center Tunnel as a trigger.

Best Strategy for Center Tunnel Levels

Do not just tap the closest box. That is how the conveyor turns into soup.

Use this order instead:

  1. Read the bottom boxes first. Check which colors can actually be filled right now. If the bottom area cannot accept the colors you might release, slow down.

  2. Check the Center Tunnel number. A 1 is low risk. A 2 or 3 needs planning. Higher numbers can eat several moves before the path opens.

  3. Use useful nearby boxes as triggers. The best trigger is a box that helps your current bottom boxes and also lowers the tunnel number. Two jobs. One tap.

  4. Leave space on the conveyor. Never empty the Center Tunnel into a packed conveyor unless you have a booster ready. You need room for bad colors.

  5. Clear the tunnel before deep searching. If the tunnel is blocking the only path forward, clear it before wasting moves on side boxes that do not matter.

  6. Pause after each release. Let the marbles settle. Watch what new boxes appear. Then choose the next trigger.

Why Center Tunnel Gets Hard Later

The feature gets nasty when the game mixes it with Hidden Boxes, regular Tunnels, and boxed-in color paths.

You may see a Center Tunnel in the middle, a regular Tunnel nearby, and several Hidden Boxes around the edges. At that point, you are not just clearing one blocker. You are testing where the useful colors are hidden.

The most wanted color might be inside the Center Tunnel. Or it might be behind it. Or the tunnel may only contain junk colors that force you to waste conveyor space before the real path opens.

That is the trap.

Hard levels use Center Tunnel to make you spend moves before you have full information. You have to test the board without losing control of the conveyor.

Common Mistakes With Center Tunnel

The biggest mistake is clearing it too fast.

Players see the number and think, “I need to make that zero.” Sure, eventually. But if you rush it, you may release colors that do not match anything at the bottom. Then the conveyor fills, your next good move gets blocked, and the level falls apart.

Watch for these mistakes:

  • Dropping every nearby box just because it touches the Center Tunnel.
  • Clearing the tunnel while the conveyor is already crowded.
  • Ignoring the bottom boxes before releasing stored boxes.
  • Using a rare useful color as a trigger when you should save it.
  • Forgetting that the tunnel may hide useless colors too.

Center Tunnel is not a reward box. It is a risk box.

When Should You Clear Center Tunnel?

Clear the Center Tunnel early when it blocks the main path and you have enough conveyor space to survive whatever comes out.

Wait when the nearby boxes are useful later, the conveyor is crowded, or the bottom boxes cannot accept many colors yet.

A good rule: if clearing the tunnel opens more playable space, do it. If clearing it only throws unknown boxes into a messy conveyor, wait.

Pro-Tip

If the Center Tunnel shows 2, do not always burn both triggers back-to-back. Drop one nearby box, let the released marbles travel, and see whether they fill anything at the bottom. Then decide if the second trigger is safe.

That tiny pause feels slow, but it saves hard runs. Especially when the conveyor is half full and one bad color can clog the whole thing.
Marble Sort Center Tunnel Level Walkthrough Examples

  • Level 201
  • Level 207
  • Level 210