Marble Sort Level 209 Walkthrough Solution | Marble Sort 209
How to solve Marble Sort level 209? Get instant solution for Marble Sort 209 with our step by step solution & video walkthrough.


Marble Sort Level 209 Guide: The Hidden Box Cross Trap
Marble Sort Level 209 looks completely locked down the moment you load in. The board is dominated by a massive cross formation in the center, and almost all of it is covered in gray Hidden Boxes. You cannot see what you are working with. The game forces you to clear the outer wings and the bottom edge of the cross before it reveals the actual puzzle.
Your bottom Boxes are demanding Green, Dark Blue, Purple, and Light Blue right out of the gate. The hard part is managing your space. The outer wings of the Top Tray contain incredibly tempting bait. One wrong tap on a blocked color will instantly jam your Conveyor Belt and end the run. You have to thread the needle, open the outer edges, and carefully peel back the gray question marks without clogging the bottom.
The Board Pattern in Marble Sort Level 209
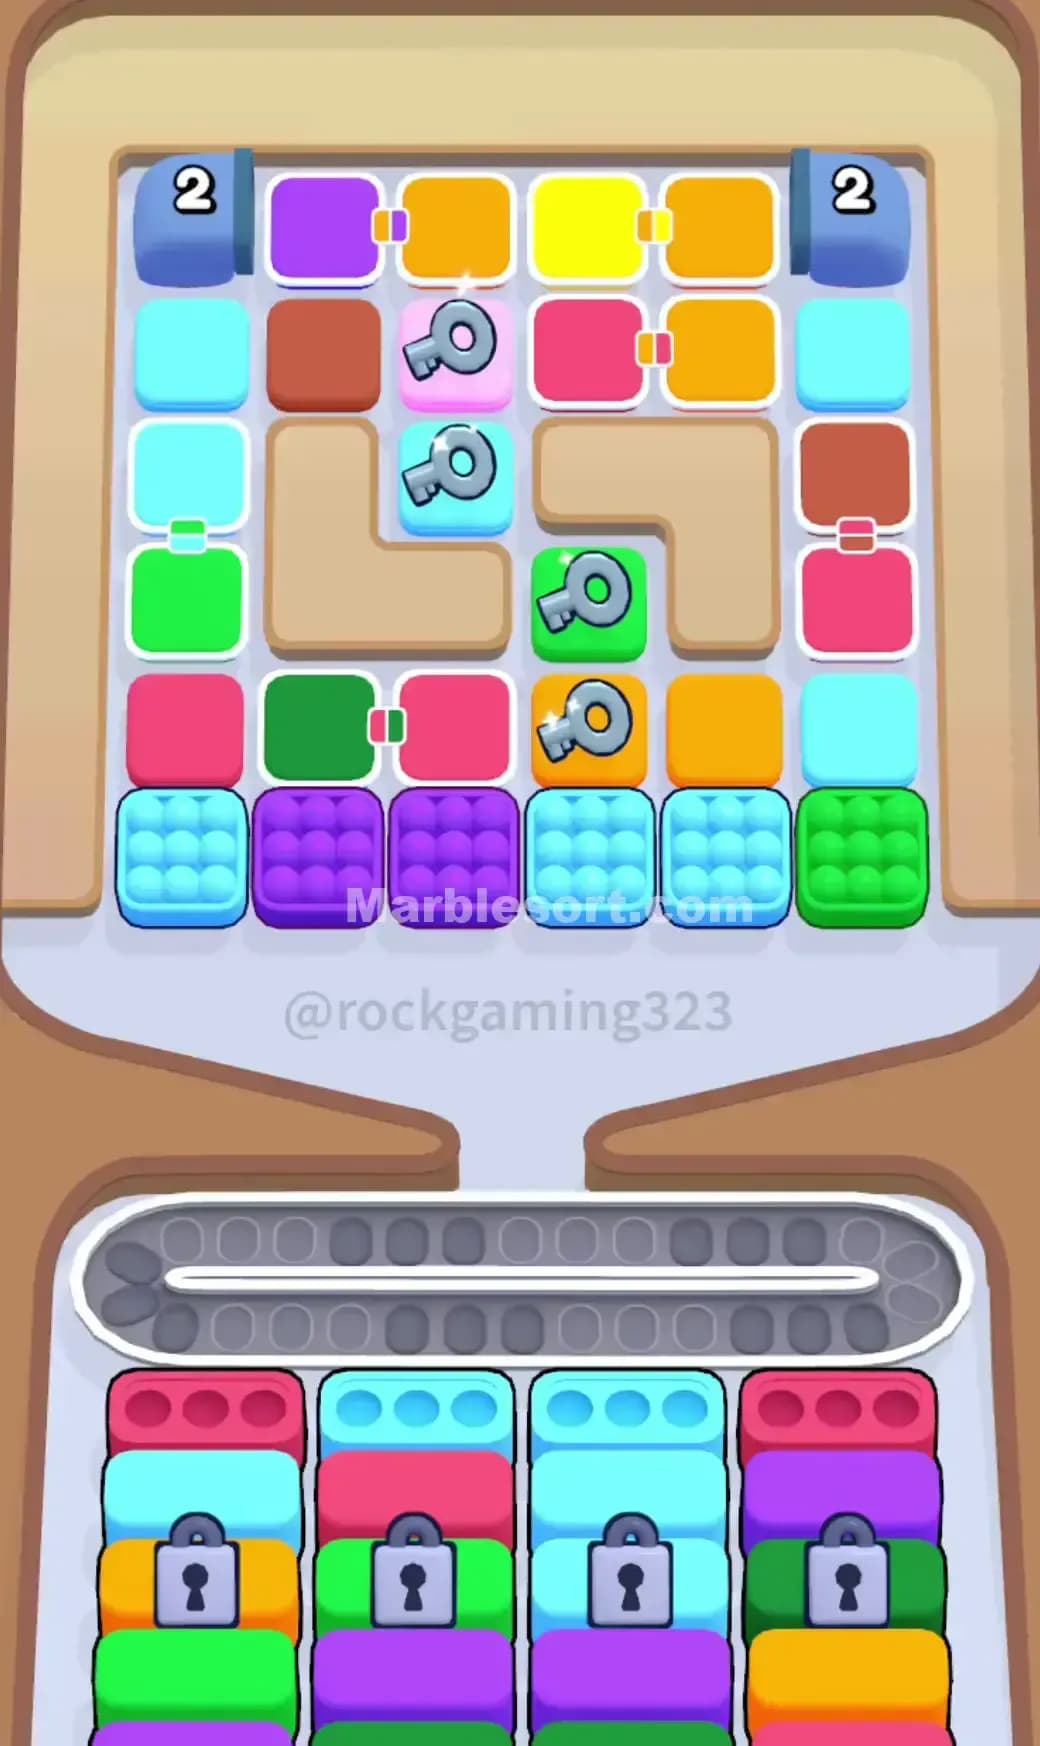
Look closely at how this specific board is built. The Top Tray is divided into three distinct sections. The center is a giant cross. The left and right sides are isolated wings.
The central cross is your biggest obstacle. It is almost entirely made of gray Hidden Boxes. A single vertical spine of visible colors cuts down the middle: Pink, Red, White, then Pink again. At the very bottom edge of this cross, three colored squares sit completely exposed: Orange, Light Blue, and Dark Blue.
The left wing is a tight cluster. You have Purple and Green sitting near the top edge. Below them, a White square and another Purple square wait to be dropped.
The right wing mirrors this shape but changes the colors. The top layer holds Dark Blue and a bright Red. The bottom layer offers Yellow and Green.
Now look at your lower receivers. There are four columns of Boxes waiting to be filled.
- Column 1 (Far Left): Starts with Green, hiding Orange underneath.
- Column 2 (Mid-Left): Starts with Dark Blue, hiding Yellow underneath.
- Column 3 (Mid-Right): Starts with Purple, hiding White underneath.
- Column 4 (Far Right): Starts with Light Blue, hiding Green underneath.
Deep down at the bottom of the third and fourth columns, you will spot Connected Boxes. These two Dark Blue Boxes are physically tied together. They will not clear until both are filled simultaneously at the end of the round.
The biggest threat on this board is the Orange block at the bottom of the central cross. It sits completely free and exposed. Do not touch it. The bottom Orange Box is buried beneath Green. If you drop the Orange marbles now, they will sit dead on your Conveyor Belt, eating up vital space while you try to dig out the Green. The White block on the left wing is the exact same type of trap.
Marble Sort Level 209 Step-by-Step Walkthrough
You need to clear the immediate front lines to force the board to open up. Precision is everything here. Do not tap anything unless its matching Box is active at the bottom.
Breaking the Opening Lines in Marble Sort Level 209
Your Conveyor Belt has no room for mistakes. Follow this exact pull order to break the first layer safely.
- Tap the Light Blue block at the bottom center of the Top Tray. This immediately flies into the top right Box in column four.
- Tap the Dark Blue block sitting right next to it. This clears the top Box in column two.
- Move to the bottom edge of the left wing. Drop the Purple marbles. This clears the top Box in column three.
- Move to the bottom edge of the right wing. Drop the Green marbles. This clears the top Box in column one.
- Watch the board shift. You just exposed the second layer of bottom Boxes. Your new targets are Orange, Yellow, White, and Green.
- Now you can safely grab that Orange bait from the center cross. Drop it to clear the far-left column.
- Grab the White block from the left wing. This clears the mid-right column.
- Grab the Yellow block from the right wing. This clears the mid-left column.
Cracking the Central Cross in Marble Sort Level 209
Clearing the outer wings strips away the first layer of gray Hidden Boxes in the central cross. The midgame completely changes the color priority. The board is about to flood with Brown, Pink, and White.
- Look at your newly revealed bottom Boxes. The left columns will pull up a heavy stack of Brown Boxes. The right columns will pull up White, Green, and Pink Boxes.
- Start tapping the newly exposed colors in the Top Tray that match. Pull the visible Green block from the left wing.
- Pull the Pink blocks from the central vertical spine.
- Every time you clear a color, a new gray Hidden Box unlocks. Stop and assess after every single drop. The game will try to hand you Red and Brown marbles from the center cross.
- Only drop the Brown marbles when the heavy stack of Brown Boxes on the left is fully exposed. If you pull Brown too early, your Conveyor Belt will jam instantly.
- Work your way up the center spine. Drop the Red marbles, then the White marbles, clearing out the middle columns.
Surviving the Connected Finish in Marble Sort Level 209
You are now in the deep end of the board. The outer wings are empty. The center cross is completely exposed.
- Clear the remaining Pink and Green marbles from the top corners of the cross.
- You will now reach the bottom of your columns. The Connected Boxes are exposed.
- These Dark Blue Boxes span columns three and four. Because they are tied together, they require a massive amount of Dark Blue marbles all at once.
- Funnel your remaining Dark Blue drops from the very top of the central cross directly into these locked Boxes. Keep your belt clear of any stray colors until both halves of the connection are full.